
“You can't study the darkness by flooding it with light.” - Edward Abbey
An almost perceptible sigh of relief across the class, in that we are now temporarily abandoning the excruciating linear perspective exercises, and moving into “describing the volume of shapes in space through the use and application of value.” OK, “shading.” Also this is the first time playing around with charcoal medium: coincidentally most folks figure out after today not to wear fancy clothes to class anymore.
Class was promptly kicked into gear with a show & tell of images relating to the new topic and an introductory primer on composition. Since there will be so much new concepts dumped on them in this one session I’ll dedicate the next couple weeks of in-class exercises towards reminding and reinforcing these ideas. Also showed a series of selected samples from successful student assignments, and gave ‘em all the handout:
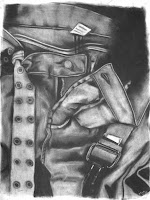
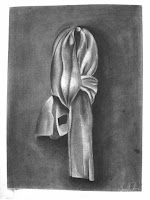
SECOND ASSIGNMENT: “Article of Clothing” due Tuesday, Feb. 24th
Experiment with and emphasize composition, using graphite or charcoal on 18x24” good drawing paper (w/border – use frame): draw a favorite item of clothing that tells a story and has some personality/identity attached to it.
Emphasize directional source of lighting, push your values, have a strong, full range of shading to give the folds volume and depth, try subtractive technique(fix & sign)
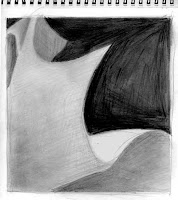
Do four panels (one per page) of roughs in sketchbook over the weekend for review next class: 4 pages/panels of thumbs in sketchbook for next Tuesday, June 17th
That all took about twenty minutes, then we jumped right on to the first of two in-class exercises. Keeping it simple as possible, the toilet paper rolls have an encore as subjects for mini still-lifes; two drawings on the same 18x24” sheet are done over the first hour, identical except that one is done first in graphite and the second using compressed charcoal. This will quickly show the comparative advantages and disadvantages of each medium; for example when they approach the second assignment, the tools that are used will to some degree reflect the complexity or simplicity of the chosen article, as it is harder to use a chunk of charcoal to render delicate lacy underwear, or pencil when filling in a black cloak, at least for the beginning level.
Prior to class I painstakingly loosely wadded up individual handfuls of the TP for each person to use to draw from. Exploration of such basic, simple shapes provide us with an opportunity to render a full gradient of darks to lights, without using any line (save for initial light sketching to roughly block in and delineate areas). I always remember detesting the laborious creation of gradient strips that went from 100% (black) to 0% (white) and the hour spent filling in each of the dozen squares in-between – I understand the principle behind such an exercise, but feel the exact same result is achieved instead by real-time close examination of a physical object. Plus this is an opening to point up the subjects of directional lighting to show a deeper range of shadows and creatively cropping compositions.
To that end, before class I had also hacked out little viewing frames using leftover scraps of matte board and an X-acto knife. These are quick and handy tools to aide in framing compositions, isolating portions of the subject in order to create a more abstracted study. After all, it’s how I pretty much go about viewing everything in my life as a cartoonist; an unending sequence of little panels (scares the hell out of people when I drive). Similar situation with the egg homework: conscious and deliberate compositional arrangements can make a vastly more interesting drawing out of an otherwise inherently boring subject.
Secondary to the task at hand is the experimentation with the new medium – comparing and contrasting the relative limitations and strengths of pencil and charcoal. Also introduced is the concept of subtractive technique, ie drawing with an eraser, and using either a stump, a wad of tissue, a scrap of cotton cloth or a fingertip to smooth out transitions.
After the first drawing with pencils is done, I did a quick demo on how to make a basic, single fold: laying down a foundation of a medium base tone and alternately knocking back deeper darks with charcoal and using an eraser to pick out and accentuate highlights, while simultaneously blending and smoothing out the transitions. The constant process of pushing back and pulling out the range of values in an isolated single fold is good to show, and it only takes a few minutes to work it up into an example of exactly what I’m looking for and how it is done. It can get confusing - many students get visually lost trying to concentrate on copying the exact likeness of each wrinkle and every fold (which notion I quickly disabuse them of), and the framing devise helps to limit the field of focus.
Also works like this tend to get muddy pretty rapidly, and it is tough to stay with it and not get frustrated half-way through just because it looks like a hopeless mess. It’ll eventually get reworked enough to a point where some order is made out of the shapeless and “blobular” areas and discernable folds begin to emerge.
A quick a step outside follows this to show how fixative should be applied and how it can also be used to layer additional touches to the piece once dry. Inhalant abuse and ventilation issues aside, some folks in the building have issues with potential brain and nervous system damage from the vapors, so best to do it outdoors.
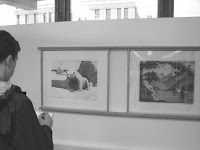
Then its off to the second exercise for the last hour of class time. This is a two-fer in that I work with several students simultaneously demo-ing how to bang out a rough reference sketch, as well as doubling as an intense value study. I also start to really ratchet up the speed factor while moving from student to student, because time is of the essence, here and with more and more of our field trips in the future. Being able to quickly sketch from life, taking visual notes, is a particular skill I emphasize in my classes; bypassing the bullshit in one’s brain (this hard/stupid etc.) and instead just reflexively reacting to the subject at hand. Not to mention in some regards I’m trying to cram a lot of information into each session, and constantly find myself caught up short and out of time (never thought I'd ever see the day I would wish for three-hour classes). And it’s always worth pointing up the, er, value of experiencing works of art live and in person, and learning from them firsthand.
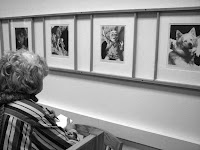
The subject is now a piece from an exhibit back on the top floor of the Rasmuson library: Housed here is the only complete collection of lithographic prints by famed Alaskan artist Fred Machetanz. These gorgeous black & white images spanning across three walls are exquisite examples of how to render a full range of value with luxurious, rich blacks and deep shadows – truly a grand master of the North. Clichéd subject matter but the technique is incredible; to my knowledge there isn’t a better example anywhere than this guy’s prints to “study at the feet of a master”, so to say. I challenge the students to find a line anywhere in these pieces, as he uses contrasting values and implied line throughout most of these works.
And lastly, while they were doing that, I had them show me their eggs - most of which of course they now know are nowhere near as fully rendered as they could or should be. A rework is assigned along with the weekend’s thumbnails as homework, which will make for a good compare & contrast/before & after example next week.
An almost perceptible sigh of relief across the class, in that we are now temporarily abandoning the excruciating linear perspective exercises, and moving into “describing the volume of shapes in space through the use and application of value.” OK, “shading.” Also this is the first time playing around with charcoal medium: coincidentally most folks figure out after today not to wear fancy clothes to class anymore.
Class was promptly kicked into gear with a show & tell of images relating to the new topic and an introductory primer on composition. Since there will be so much new concepts dumped on them in this one session I’ll dedicate the next couple weeks of in-class exercises towards reminding and reinforcing these ideas. Also showed a series of selected samples from successful student assignments, and gave ‘em all the handout:

SECOND ASSIGNMENT: “Article of Clothing” due Tuesday, Feb. 24th
Experiment with and emphasize composition, using graphite or charcoal on 18x24” good drawing paper (w/border – use frame): draw a favorite item of clothing that tells a story and has some personality/identity attached to it.
Emphasize directional source of lighting, push your values, have a strong, full range of shading to give the folds volume and depth, try subtractive technique(fix & sign)
Do four panels (one per page) of roughs in sketchbook over the weekend for review next class: 4 pages/panels of thumbs in sketchbook for next Tuesday, June 17th

That all took about twenty minutes, then we jumped right on to the first of two in-class exercises. Keeping it simple as possible, the toilet paper rolls have an encore as subjects for mini still-lifes; two drawings on the same 18x24” sheet are done over the first hour, identical except that one is done first in graphite and the second using compressed charcoal. This will quickly show the comparative advantages and disadvantages of each medium; for example when they approach the second assignment, the tools that are used will to some degree reflect the complexity or simplicity of the chosen article, as it is harder to use a chunk of charcoal to render delicate lacy underwear, or pencil when filling in a black cloak, at least for the beginning level.
Prior to class I painstakingly loosely wadded up individual handfuls of the TP for each person to use to draw from. Exploration of such basic, simple shapes provide us with an opportunity to render a full gradient of darks to lights, without using any line (save for initial light sketching to roughly block in and delineate areas). I always remember detesting the laborious creation of gradient strips that went from 100% (black) to 0% (white) and the hour spent filling in each of the dozen squares in-between – I understand the principle behind such an exercise, but feel the exact same result is achieved instead by real-time close examination of a physical object. Plus this is an opening to point up the subjects of directional lighting to show a deeper range of shadows and creatively cropping compositions.
To that end, before class I had also hacked out little viewing frames using leftover scraps of matte board and an X-acto knife. These are quick and handy tools to aide in framing compositions, isolating portions of the subject in order to create a more abstracted study. After all, it’s how I pretty much go about viewing everything in my life as a cartoonist; an unending sequence of little panels (scares the hell out of people when I drive). Similar situation with the egg homework: conscious and deliberate compositional arrangements can make a vastly more interesting drawing out of an otherwise inherently boring subject.
Secondary to the task at hand is the experimentation with the new medium – comparing and contrasting the relative limitations and strengths of pencil and charcoal. Also introduced is the concept of subtractive technique, ie drawing with an eraser, and using either a stump, a wad of tissue, a scrap of cotton cloth or a fingertip to smooth out transitions.
After the first drawing with pencils is done, I did a quick demo on how to make a basic, single fold: laying down a foundation of a medium base tone and alternately knocking back deeper darks with charcoal and using an eraser to pick out and accentuate highlights, while simultaneously blending and smoothing out the transitions. The constant process of pushing back and pulling out the range of values in an isolated single fold is good to show, and it only takes a few minutes to work it up into an example of exactly what I’m looking for and how it is done. It can get confusing - many students get visually lost trying to concentrate on copying the exact likeness of each wrinkle and every fold (which notion I quickly disabuse them of), and the framing devise helps to limit the field of focus.

Also works like this tend to get muddy pretty rapidly, and it is tough to stay with it and not get frustrated half-way through just because it looks like a hopeless mess. It’ll eventually get reworked enough to a point where some order is made out of the shapeless and “blobular” areas and discernable folds begin to emerge.
A quick a step outside follows this to show how fixative should be applied and how it can also be used to layer additional touches to the piece once dry. Inhalant abuse and ventilation issues aside, some folks in the building have issues with potential brain and nervous system damage from the vapors, so best to do it outdoors.

Then its off to the second exercise for the last hour of class time. This is a two-fer in that I work with several students simultaneously demo-ing how to bang out a rough reference sketch, as well as doubling as an intense value study. I also start to really ratchet up the speed factor while moving from student to student, because time is of the essence, here and with more and more of our field trips in the future. Being able to quickly sketch from life, taking visual notes, is a particular skill I emphasize in my classes; bypassing the bullshit in one’s brain (this hard/stupid etc.) and instead just reflexively reacting to the subject at hand. Not to mention in some regards I’m trying to cram a lot of information into each session, and constantly find myself caught up short and out of time (never thought I'd ever see the day I would wish for three-hour classes). And it’s always worth pointing up the, er, value of experiencing works of art live and in person, and learning from them firsthand.
The subject is now a piece from an exhibit back on the top floor of the Rasmuson library: Housed here is the only complete collection of lithographic prints by famed Alaskan artist Fred Machetanz. These gorgeous black & white images spanning across three walls are exquisite examples of how to render a full range of value with luxurious, rich blacks and deep shadows – truly a grand master of the North. Clichéd subject matter but the technique is incredible; to my knowledge there isn’t a better example anywhere than this guy’s prints to “study at the feet of a master”, so to say. I challenge the students to find a line anywhere in these pieces, as he uses contrasting values and implied line throughout most of these works.

And lastly, while they were doing that, I had them show me their eggs - most of which of course they now know are nowhere near as fully rendered as they could or should be. A rework is assigned along with the weekend’s thumbnails as homework, which will make for a good compare & contrast/before & after example next week.

No comments:
Post a Comment